In an effort to save money and be more self-reliant I set out to make my own compost container for our kitchen. It only costs $1.50 to make!
Making Dirt – Part 1
Note: This is part one of a two-part article on compost.
Read part two – DIY vermicomposting worm farm – here.
I knew I was getting old the day I began to think that making my own garden dirt was cool.
Don’t get me wrong… I don’t think I’m old, and I don’t dislike the fact that I am getting older, actually, I think it’s pretty cool. I just find it amusing the way our thinking changes as we age. The one wish I do have is that I knew what I know now when I was 16!
Kitchen Compost Buckets
Today I want to follow up on a promise I gave to several FiveCentNickel.com readers in my “Breaking Free From a Culture of Temptation” article a while back. I promised I would write a post detailing how I constructed a kitchen compost bucket for very little money. In the original article, my temptation to purchase a kitchen compost bin rather than make my own almost won. Here is the snippet from the original article:
A store-bought kitchen composting bucket ($20) Here again, I made my own… and only spent $1.50! This will likely be the subject of a forthcoming post.
Both of these compost-related purchases were very tempting, and I really had to fight the urge to buy and instead choose the frugal road. Beyond saving money, I have more pride in these possessions — partly because I made/improved them, and partly because I know that I sacrificed my short-term wants for my greater goal.
Making my own bin was easy, cheap, and satisfying. Much more satisfying than buying one for $20, or worse yet buying one for $50! If you are not into making your own, you can purchase one of the two I was debating between. They are both high-quality options that I would have gone with if I weren’t über frugal!
Store-bought kitchen compost bins
- The $56 option is a stainless steel kitchen compost bucket that employs a charcoal filter to eliminate smells.
- The $20 option is a plastic bucket that also employs a charcoal filter.
As I mentioned above, each of these is a solid option if you are not trying to play the role of Fruggie McFrugalpants. Prices posted were taken at the time of writing.
So What Did I Do?
I made my own of course!
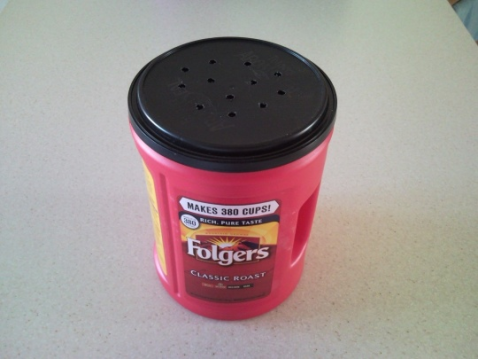
My homemade, DIY kitchen compost bucket
- The $1.50 option is an empty plastic coffee can with its very own built-in charcoal filter.
Here’s how I did it:
- An old empty coffee can or similar free container with a resealable lid (I got a few from the office that was being tossed)
- A package of charcoal filters from your local pet supply store – they sell them for kitty litter boxes (this eliminates the odor)
- A drill with a 1/4″ bit
- A hot glue gun (super/crazy glues should work fine too)
1. Start with your parts and tools
2. Drill 10+ holes in the lid with a 1/4″ drill bit
3. Hot glue the charcoal filter to the lid
4. Voila – the finished product
We store our DIY Kitchen Compost Bucket under our kitchen sink so food scraps can easily be added to it during food preparation. My wife is very particular about smells and was happy to find that no odor came from our homemade bin, thanks to the charcoal filter. Just like with any other bin equipped with a charcoal filter, you will have to replace the filters every few months if you want them to remain effective.
Did you make this compost container for your kitchen?
*******


For some reason, hitting the “reply” button on these comments is not working for me.
I wanted to share with others how to add your kitchen scraps to your soil, if you’re not going to be putting together a compost pile:
Take your kitchen scraps out into your garden. Dig a hole. Toss in the scraps and, if you feel so inclined, use a shovel to further cut up things like citrus peels and egg shells. (The smaller the pieces, the quicker the scraps will become part of your garden “fertilizer.”) Shovel in the soil, covering your scraps.
Cover the filled-in hole with a large piece of screen. (The size mesh on your screen doesn’t really matter. You’re only using it to prevent scavengers from digging up your scraps.) Weight down the four corners of the screen with some heavy rocks. I like to use a piece of screen about 2′ x2′ or larger. We have a couple pieces of screen, rotating —– to allow the scraps time to break down. If you don’t have rocks, I find that shoving in tomato cages at each corner of the screen works just as well.
As for making your own indoor kitchen scraps bucket: I have found the absolute best method is this:
Purchase a stainless steel 4-quart dog pail. (“Indipets” makes them. And there are other companies. Shop around.) I got ours at a dog show (cheaper than online). We are a household of three adults. All of us cook, so we have plenty of scraps for our bucket. You may even want to purchase a bucket which has a flat back, so you can store your scrap bucket up against a wall. We keep our bucket on our kitchen counter, right next to the sink. There really is no smell at all. (And we add meat scraps, too.)
Pro tip: When using this stainless steel bucket method, you may need to have a large, flat bowl (pasta bowl?) to use as a moat. Here in CA we get ant invasion that lasts throughout the summer months. Keep your bucket surrounded by water . . . no ant problems.
As a lid for the bucket, you will have to find an old bread/butter plate, preferably a nice thick one. Thrift store? Swap meet? What’s good about using the plate as a cover is —- you can *tilt it* when you want to add scraps. No need to be taking any lid off or screwing it back on. No need for charcoal filters that probably aren’t recyclable as compost.
This one stainless steel bucket should last you for at least a decade. PLUS — it has a handle, so it makes it plenty easy to haul your scraps out into your garden.
Feel free to ask me any questions re: kitchen scraps/composting. I’ve been doing this now for about 50 years. (Hope the site will allow me to reply.)
Hello,
Anyone know how to keep wild life such as skunks and bears from an outdoor compost? We are transitioning from urban to rural-ranch life and eager to start composting but don’t want to attract these lovely scavengers. Thanks
Perhaps an electric fence.
Hi, Rachel. See my other comment (April 2, 1:03 p.m.). Use a screen (2′ x 2′ or larger) to cover your scrap hole and rocks to weight it down. We have two screens that we rotate use of, allowing earlier scraps to biodegrade. Add a bit of water once in a while, to help the scraps break down faster.
If you are hot gluing the filter to the lid, how do you change it?
It comes off pretty easy, then you just glue a new one on.
Hi Matt,
I have been using a repurposed plastic ice bucket, labeled: “FOR MOTHER EARTH” for a number of years, it has a lid and no air holes. I have never used charcoal filters and just empty the bucket regularly.
My question, what do you do with the charcoal filters? Can you compost them or should they be thrown away?
Thanks! I just got a new stainless steel compost pail like the one you recommend for my birthday and I am wondering if the charcoal is necessary?
I am like your wife with the gift and curse of a sensitive nose.
Thanks, for sharing your expertise.
Regina
That is a great question Regina, and one I do not know the answer too. Perhaps someone else in the community does so let’s see if anyone else answers.
Check to see if your charcoal filter is compostable/biodegradable by trying to tear it in 1/2. Is the filter paper or does it contain plastic? If the filter tears easily, and you see no evidence of plastic —- you’re good to go.
Also: Just this past year I discovered that a great many “paper” teabags contain plastic. Mind-blowing, right? Check online to see if you’re drinking tea that contains plastic. I only discovered this nasty fact after researching those Starbucks’ “Teavana” tea nylon-looking teabags. Not only are those teabags plastic (!), the labels also contain plastic backing. UGH.
Celestial Seasonings, Tazo, Teavana . . . All contain microplastics. You want to avoid using their products. Certainly DO NOT put them in your garden.
The teabags: Forgot to add —– you most certainly don’t want to add those microplastics to your body, either.
i forgot to add, i found the same exact 5″ filters pictured at my pet supply store. pkg of 2 filters for $2.79
thanks for this idea! i finally made mine today (i’ve had the coffee can saved for about a year lol). the only thing i did differently was drill 4 extra holes closer to the edge. then i used 4 brads to fasten the filter to the lid (instead of gluing it).
I already use a coffee can for my kitchen scraps, but the filter is a great idea I hadn’t thought of. I also have an old kitty litter pail on my back porch, I just empty the kitchen scraps into it, then when it gets partially full I take it to the compost pile. I am going to add the charcoal filters to both. Thanks for the great idea.
My pleasure Vera, glad to help. Blessings.
That’s pretty sweet… I live in an apartment and I don’t have a yard; only a small little dirt median out in the parking lot area. I always thought I couldn’t compost anything because I couldn’t dig a compost pit or build one of those wooden boxes, but this could totally work for me! I actually go through these 5 pound plastic jugs of protein powder all the time (the containers are probably 2 gallons or so) so I have empties everywhere and I’ve been looking for some way to use them… Thanks!
I have a stainless container with holes in the lid and the filter that fits in the lid. My compost grows mold and now with warm weather is starting to “sweat”. How do I stop both? I wish I found your site before I bought the container.
The teabags: Forgot to add —– you most certainly don’t want to add those microplastics to your body, either.
Lenita:
Don’t worry about the mold or the sweating of your container. Both are safe occurrences. Especially the mold. It only means your kitchen scraps are already doing their thing —- decomposing.
Sorry I am new to this but I don’t understand what I would do with my kitchen compost?
Here’s a link to composting you might find helpful:
http://www.thriftyfun.com/tf91163705.tip.html
Hi. I am just learning about composting and gardening. I live in an apartment. I am attempting to grow plants on my porch. I mentioned to my mom that I wanted to collect scraps for composting. I planned to give her the scraps for her garden. Can i use some for my porch plants? She gave me a plastic diaper container. Will this work? I am unable to drill holes, will that be a problem?
Hello, Leah:
I commented (extensively) at the end of this thread re: best kitchen scraps container. You really don’t need a huge container for your scraps —- unless it’s your “second” bucket and the one you have outside and want to fill before then burying the contents.
Many years ago I went to a dog show and found a nice 1-gallon stainless steel bucket (with handle). Cost was low. “Indipets” sells them online, but shop around for best deal with them or other manufacturers. Just make sure it’s stainless steel. Bucket is about 8″ x 8″.
Keep this bucket on your kitchen counter. Cover its 8″ opening with an old bread/butter plate. Some solid type plate. The beauty of this is you can tilt the plate/ lid when you want to add scraps. Makes things so much easier.
We’ve been using bucket and plate for decades. No smell. We even add meat scraps.
Once you get a bucket-full of scraps, bury it out in your garden. Place a screen about 2′ x 2′ or larger atop the scraps’ hole. Weight it down with some solid rocks. Scavengers can’t get to it —– unless you have Bears . . . We have two screens that we rotate —– allowing the scraps to biodegrade/break down. If you add a bit of water occasionally to these scrap holes, it will help to break things down more quickly.
Pro tip: If you have any type of ant problem —– make sure to employ a large flat pasta-type bowl. Fill it with a couple inches of water, keep bucket inside this moat. No ant can access your scraps.
I built this two but instead of glue the filter I used 1 inch fasteners you could use smaller. But these I had on hand. So the filter can be changed every so often. Just push then fasteners through the filter and bend them back. It works great.
This may be a stupid question: Once it is full, do you go and dump into larger, outdoor compost bin or do you just dump it into the garden and mix it into the soil? I am really interested in starting a large compost bin but haven’t yet. However, I have started using a small, counter top one like yours but with no filter. But I’m wondering if it’s all for not if I don’t have a larger bin to add it to, ya know?
Thanks.
I’ve been using mine for almost two months now. I empty mine into a larger compost bin outdoors. I’ve seen online where you can dig a hole in your garden and bury it. I’ve been using my indoor bin for about two months now and there is no smell whatsoever. Each time after I empty it, I rinse it out.
I have a 6″ deep layer of pine straw in my beds. I keep the compost in the kitchen for a few days then pull back an area of pine straw and dump the compost on stop of the soil. Maybe not the best use, but it turns into top soil after a few months, improving the beds, and keeps my garbage at home!
I have been using my coffee can composter for a couple of months now and have been mostly pleased. The charcol filter kept coming off, the hot glue wasn’t durable enough, but not a problem, because when I ditched the filter there weren’t any unpleasant smells that anyone in our family could discern (we keep it under the kitchen sink in a cabinet). However, we were suddenly besot by gnats, like fruit flies. I never saw any come out of the bin when I took the lid off, so I didn’t think they were coming from there…wrong, they were. The last time I emptied it there were little larvae all wriggling about. Sooo, the moral to my story is, try one of two things, refridgerate or keep two bins and alternate, letting one be rinsed thouroughly and sit in the sun while the other is in use. Which I will probably choose the latter since our fridge is always packed. Other than those small inconviences, it’s great and I’m always amazed at how quickly it fills up (meaning I realize how much we threw away for no reason) And to boot, my outside compost in working out nicely with fresh additions, I just like to keep those little wigglers outside where they belong, lol!
The next step is the plastic bucket compost bin in the yard- so easy to make and no smell if you keep the green/brown ratio right.
Thanks for the great idea. However, I went to four different pet stores and Walmart over the weekend looking for the charcoal filters and the prices were between $5-7 for a 2-pack of filters. Still cheaper than buying a kitchen compost bucket, though.
try looking in the section of the store where they sell portable air filters or search on amazon. I found a “universal replacement activated carbon pre-filter” that you can cut to size for $1.50
Good info, thanks Donna.
I keep my kitchen waste in a large Tupperware container in the fridge. If I get pressed for fridge space the coffee container idea will be an option.
why do you rinse your eggshells before putting in compost???
Well, I do it to keep the stink back. Anyone who uses factory farmed eggs should do it to avoid salmonella contamination.
Thanks for the easy DIY project. This was just what I was looking for. I never would have known to check out the pet store for the carbon filters. I used a 5 quart ice cream container that has a handle. So far so good.
Awesome Marie, gald you found us.
Thanks Matt. Very helpful. DH has saved some cans for me for organization purposes (nothing like a ton of crayons in a coffee can to bring back memories of my childhood) and we actually have about 6 now which is a little much. This will be a good repurposing of one, especially with little ones around who don’t eat the skins of apples and eat a ton of other fruits with peels. Egg shells are ok too right?
Sorry for all the questions and thanks for bearing with me. 🙂
Yep, just make sure you rinse the egg shells before putting them in.
I stumbled upon your article here and am inspired. Can I use a metal coffee can or will the metal leach into the compost? Also, do I need to stir it up while it is in the can before I use it in the garden, or just dump and spread in the garden when it is full? Thanks. New to composting. 🙂
Hi Jennifer, metal cans will be fine, as long as they dont’ rust. No need to stir, just dump it in. Glad you found us, God bless.
Great idea for UNDER the sink, but for those who keep compost container beside sink, it possibly works. I used a child’s metal beach bucket (Goodwill) and found a coffee can lid that fit it. Also found a plastic jar lid to sit the bucket in so I didn’t have to worry about a ‘rust ring’ from cheap bucket. (BTW …it all is red and looks nice on the counter top.)
Am thinking of looking for a new plastic beach bucket….
Way to be creative Maralyn, sounds cool.
My husband &I have been gardening for all of oue married life and love the goodies at picking time!!! We’ve just in the last few years been composting. This homemade kitchen composter is jsut what we need to make sause we just puut all table scraps into an old icecream container and “Boy!” does it smell after afew days. SUPER IDEA!! Now I’m saying to myself, “Why didn’t I tink of that?” GEEZE! So now, I’m gonna be makein us one of them there thingies!!!!!!lol
Luv You Guys,
Carla
Awesome Carla, glad we could help. 🙂
I just went to Goodwill and bought a really nice cookie jar, that matches my kitchen decor, for half a buck. It sits right on my countertop, not under the sink!
Way to think outside the box.
Do I just empty the contents when the bucket is full? I don’t have a worm bed. I’m mostly just interested in not sending all of this food waste to the dump.
Hey i have a similar bin, and I’ve gotten to the point where I need to replace my filter. Can I compost the first filter or does it need to be thrown out?
hi matt, your avatar picture is like iguazú falls on argentine?, i love iguazú fall’s i grow up closer to them, i am happy to se people showing this amazing place. bye
Excellent article but step 4 talks about a “viola”, and I fail to see how a stringed instrument relates to composting.. Maybe you meant “voilà” 🙂
Thanks for noticing, I updated it.
I just finished this super-easy project. Stong onions and other veggie scraps are completely odor-free in this container on my kitchen counter. Thank you for posting such an economical alternative to the fancy kitchen compost pails available on the market.
You’re very welcome Molly, thanks for your feedback.
What about BPA/Phthalates in the plastic?
You can use a glass container.
I love this! I have been trying to figure out a compost solution that was diy and I really wasn’t pleased with the thought of shaking and the messiness of a regular compost. this seems so great and my 3 and 4 yr old are obsessed with worms anyway. finding 2 worms in the ground can occupy them for an hour, although can sometimes be hazardous for the worms, haha! This kitchen bucket is just the icing on the cake!
I was wondering, If I was willing to spend an extra few dollars on the vermi-bin and make the bottom a shallow container instead of a lid, would there be any harm in that? I am VERY accident prone and emptying the “tea” out of that lid seems precarious.
Lastly, I wanted to say thanks to you and your wife. This site is one of the best I have found for me, because I have a family of four and just started gardening this year. All of my gardening research has sort of sent me on this quest of becoming more self sustainable. What’s funny is it’s made me the accidental environmentalist. I have gotten so many great ideas from your site! I can’t wait until Christmas, when I can give gift sets of the vanilla extract bottles and I am adding some of my homemade dried herbs in the victorian square bottles from that bottle website!
We really appreciate the kind words of encouragement Torri. Yeah, feel free to construct whatever you need for a lid… whatever makes it easiest for you and still works. God bless.
We have the $20 bucket, and despite the comments, we noticed the smell, so I rigged a sponge holder to pt a charcoal filter in. But then mold attacked. IS that because I don’t have air vents? Should I drill holes in my lid (given that I’ve already got the thing) or should I just ignore the mold? You say you kept the same filter for months, but I’m only getting a week out of them…
I drilled holes in my top, but it was a free plastic coffee can lid. I am actually on only our 2nd filter in years. Sometimes it gets a little moldy but then I just empty the container, wash it, and dry it out… mold disappears.
What a great idea! Currently, i just have a mixing bowl on the counter lined with a compostable liner, but fruit flies and stink are becoming issues with the weather warming up. Do you glue the filter onto the top of the lid or bottom? Is the filter safe for little kids’ hands? Would this work with an ice cream bucket as well? Thank you in advance!
Glad to help CL – We glued the filter to the underside of the lid. It’s safe, just a normal kitty litter filter.
Great idea! I’ve been wanting a kitchen compost pail but couldn’t part with the money. Usually I just collect the scraps in a bowl and toss in the outdoor compost. Hate going out there when it is so dark though. This is so quick and easy and beats paying $50 plus dollars!
Glad we could inspire and help out Loonette!
This is awesome! Was just looking again online to purchase a compost bucket. Came across your directions. Have been using a pale w/ lid outside the kitchen door. Now I’ll have to improve the pail w/lid with your steps listed!
That is what my grandma used to do. Using the setup in this article keeps the smells at bay and can be cleaned and reused for years and years.
Just wondering how long it takes to compost in kitchen plastic coffee composter.
This container isn’t for making compost, it’s for holding scraps temporarily in the kitchen until full, then moving to compost pile.
The one you have listed for $56, I got at a store called World Market here in Ohio for $30. Same size, I believe. I know you can put coffee grounds in your composter but what about the filters? I’ve read that they should be unbleached but the only filters I can find are white so I’m assuming they are bleached (?). Guess I need to find one of those reusable filters to fit my coffeemaker. I think I read somewhere that you should put shredded newspaper in the composter too…not sure if there was a specific reason.
Some people are really picky about their compost, only putting in “organic” scraps, others put in anything… including bleached coffee filters – use whatever you’re comfortable with. Also, you should buy a reusable coffee filter… we have one and love it. Anytime you can get something reusable over something disposable – do it.
How long does it take before the kitchen scraps become compost?
With the worms? About 5 times faster than a compost pile in the back yard, so around 4-6 months depending.
Do you have a problem with fruit flies with your homemade compost pail? Unfortunately, I, too, just paid for a plastic bin…
No, in the years we’ve been using our compost pail we have never had fruit flies in it. Ours is always covered and the flies cannot get through the charcoal filter – neither can the smells. If you have flies you need to dump the contents of your bucket outside, wash the bucket thoroughly, then start over… just make sure that it is sealed tightly and that you don’t leave the lid off when using it. Put the scraps in a bowl until you’re done cooking, then put them into the compost pail all at once.
I’m just getting started with composting. Last summer I was using a similar coffee can to collect used coffee grounds. If I waited too long (maybe 2 or 3 days) before taking the coffee grounds out, I noticed a white substance (mold?) growing on the damp grounds. Will that substance have any bad affect on the compost?
Yeah, that is probably mold and it is just part of the decomposing/composting process.
I am loving this. Just found it and plan to make a lot of homemade products from now on. Have been working at going natural already. I do want to remind everyone that you should NEVER, NEVER put any meat products in the compost pile! Only things like peels, rinds, shells, etc.
Getting more in touch with our food can be a very fun and rewarding experience!
Where do you find the charchole filters? Do you cut them to size? How much are they?
I love this idea of a compost pail. what other containers can be used i wonder other then plastic. I have wanted to compost for a long time but it just seemed to much to pay for a compost bin, outside lawn compost or even water barrels.why is anything to help better our environment always cost more?
Beatrice – You don’t have to spend alot of money on an outdoor compost pile. I use the “open pile” method screened by some azaleas and it works just fine: decide where your pile will be; dig up the soil/dirt where you are going to place the pile; lay down a nice bed of twigs or small sticks and start adding your chicken scraps and yard waste. Don’t bother with a “starter” or compost enhancer; just toss some dirt on the pile from time to time. You can water it and turn it, but even if you don’t do these things, you will get wonderful compost in several months or a year. Just remember to add green waste (lawn clippings, plant cuttings, kitchen waste) and brown waste (shredded newspaper, shredded leaves). If my pile gets too “wet”, I just shred up some newspaper and mix it in.
Good luck!
Thank you for this post. I just finished mine yesterday and it works out great.
If you use a container lid that’s larger than the filter, does that really matter as long as you only drill enough holes to fit the filter size?
Um, you are likely to have better results if the lid fits securely on the container, but you can give it a shot.
I was wondering about this as well. I Think diyNatural misunderstood your question. I think you’re talking about a container with a lid that fits securely but is larger than the filter. In which case you would ither have to drill many holes and use multiple filters, OR only drill enough holes to cover one filter. I can’t think of any reason why the latter wouldn’t work just fine.
Just wanted to thank you for the inspiration. I found an asparagus steamer pot at Goodwill and a lid with a steam vent valve that fit the pot just right. No drilling needed! In and out in $5 and it looks darn close to the $56 number. *pats self on back*
great diy! i am thinking of making a compost as well. i am going to go home and look for a plastic bin with a tight lid. thanks for the excellent idea!
We just use an old half gallon ice cream bucket with no filter. It is twice the size of your coffee can which seems small for us. Smells are no problem due to high amount of coffee grounds maybe, real cheap filter. I have always been attracted to those pretty ones in catalogs and online but never caved in because you cannot beat free.
This is what I have on hand also but I do not have coffee grounds….I use instant since I a lone drinker of the juice! lol Guess I’ll buy the charcoal filters. Can’t wait to start my frugal bin!!!
Thanks for saving me $20!
I have all DIY tools to make my own and so cheap kitchen compost bucket except the hot glue gun, I will purchase it for sure cuz in future I can save many dollars and can make a bucket for each room separately as cost is too much low, will suggest my friends to view this post to save the money.
Hi Matt – I made one of these kitchen compost buckets from a small white bucket (larger than a coffee can). It works very well, no smell at all. It sits on the floor next to the trash can and amazingly, my family actually uses it without even being asked! Thanks for the DIY instructions! I see a worm bin in my future…
@Matt How often do you empty the container i.e. when full or every few days, etc? How do you replace the charcoal filter….just rip it off? Did the filter fit without trimming?
Mr. Vandelay…
We empty it when it gets full (we NEVER smell it). To replace the filter – yep… just rip it off & glue a new one in its place. We have had ours for several months now and are still using the first filter. It started to get a little mold on it, but the mold disappears after you empty it and rinse it out. We will not replace it until we can “smell” the bucket.
Matt,
That’s a great idea for when the weather turns bad & running the kitchen accumulation outdoors to the big tumbler becomes dreadful. I’m gonna try it.
In the meantime, what do you suggest (other than a large garbage can & heavy-duty shredder) to collect the various cardboard boxes? We have a family of 5 and cereal boxes, frozen meal boxes, etc accumulate quickly & become a tedious chore to tear down to prevent a tower from forming on the counter.
Well, my wife and I just break the boxes down and put them in our recycling pile. I suppose you could store them in the garage if you want.
I cut cereal boxes into strips and put them through the paper shredder, then into the compost! They make a great form of “brown” material. This is fine is you’re putting it in flower beds or other locations where non-edibles are grown. If you’re using the compost in vegetable or fruit growing areas, you should probably omit any printed material as you don’t know what’s in the ink.
That said, I love putting shredded paper, paper towel rolls, etc. into the compost.
What size are those charcoal filters? Did you have to trim them to fit the coffee lid?
The filters are a 5″ diameter. They fit perfectly in that coffee lid as purchased – I did not have to cut them. I bought them at Pet Supplies Plus.
Very cool idea and so easy to make.
Just the ticket! Thank you!
Alyzabeth’s Mommy for Eleven Months!
.-= Alyson´s last blog ..Book Swap Package! =-.
Interesting idea here, I have been wanting to do some organic gardening and this looks like a great idea to help that. I would have probably just went out and bought some compost.
Thanks for the good information.
making your own compost has so many benefits, and this cheap and easy bucket to throw kitchen scraps in is a great way to get started! enjoy…
Hey, a 35 pound kitty litter bucket works well for compost too. (After it is emptied of original contents, of course!) Could also be adapted with the filter. Has a built in hinged cover that seals. Cant wait to hear about the worm bin! 🙂
Wow… that’s a lot of kitchen compost! 🙂 Worm bin info coming tomorrow.
That’s what I use too! Didn’t put a filter on mine yet though. It sits outside my back door. Hoping raccoons won’t get into it!
Wish I would have seen/thought of this last year when I spent flipping $20 on a stupid plastic pail. We take ours out to our worm bin.
.-= Paul @ FiscalGeek´s last blog ..The FiscalGeek Cell Phone Trade In Program: Free Cell Phones for Life =-.
That’s what I do too. Actually part II of this post is my homemade worm bin… which will be coming out tomorrow. 🙂