
Making infused vinegar is a simple and fun process. Suit the end product to your palate so it lends a flavor blast to your favorite dishes!
Furthermore, as Spring and Summer start upon us, DIY-infused vinegar is a wonderful way to capture the flavors of the seasons and keep them year-round. It is also healthy to cook with vinegar.
Infused vinegar is so easy to make and great to use in the kitchen or give as gifts. And, if you enjoy the flavored vinegar you can buy from the specialty oil and vinegar stores, you will find that making your own infused vinegar is so much more cost-effective, and you can make nearly any flavor you like!
Best Vinegar for Infused Vinegar
To begin with, the best type to use for infused vinegar is light-flavored vinegar. Straight, white vinegar isn’t the best choice because of its strong flavor.
Also, tasting different types of vinegar is essential. Doing so helps ensure you have the best flavor for your palate and your infusion.
To list, here are some of my favorite choices:
- White wine vinegar: is a cost-effective vinegar with a light flavor that is best for savory applications.
- White balsamic vinegar: will be sweeter than white wine vinegar and is wonderful to use with fruits or for a sweeter flavored vinegar.
- Champagne vinegar: while a more expensive vinegar will add a unique, light flavor. Taste it before using it to see how you think it will complement your desired flavors.
- Balsamic vinegar: this dark vinegar will overpower lighter flavors, but is great for stronger, sweet flavors.
Again, the vinegar you start with becomes a part of your finished product. So make sure you like the flavor and think the flavoring agents will complement it well.
Tip: if you want to use ACV check out our article for learning how to make apple cider vinegar. Best to start with the best!
How To Make Infused Vinegar
Another cool thing about infused vinegar, it’s a simple process with very little hands-on time.
- Start by adding your flavoring ingredients and vinegar to a glass jar, using 1 part infusing matter and 2 parts vinegar.
- Next, cover with a non-reactive lid and store out of direct sunlight.
- Then shake every couple of days for 2-4 weeks.
- Finally, taste and strain your vinegar when the flavor is the way you like it.
Some recipes have you lightly heat your vinegar and infusing materials before placing them in the jar. While this does speed up the infusing process slightly, but if you heat your vinegar to boiling, you risk reducing some of the acidic punch of the vinegar itself.
So, in my recipe below, I don’t heat the vinegar. Because I don’t mind waiting an extra week or so for the infused vinegar to reach a flavor that I like.
Shelf-life of Your Vinegar
Strained-infused vinegar will last for 5-6 months, possibly even more if kept in a clean, sealed container.
In truth, it is important to strain your vinegar very well. Doing so leaves you with little to no plant matter left in your jar. And the less plant matter you have, the longer your vinegar will last.
Some people like to leave one of two sprigs of herbs in the jar as a decoration. But, keep in mind that any material left in the jar will continue to infuse the vinegar and may change the flavor. For example, using chile peppers and leaving some in the jar for decoration means your vinegar will continue to infuse and gain heat.
Flavoring Your Infused Vinegar
You can use any plant matter you like to infuse your vinegar. Herbs, spices, zest, chiles, etc. Here are some common flavoring ingredients.
- Citrus Peel
- Garlic
- Ginger
- Chile peppers
- Lavender
- Lemon balm
- Onion or shallot
- Mint
- Rosemary
- Thyme
- Tarragon
- Basil
- Oregano
As you can see, your imagination is the limit when it comes to infusing ingredients.
Uses for Flavored Vinegar
- Mix with olive oil for a salad dressing
- Sprinkle on roasted veggies
- Drizzle on steamed veggies
- Marinade meat, poultry, or fish
- As a dressing for pasta salad

Infused Vinegar Recipe
Making infused vinegar is a simple and fun process. Suit the end product to your palate so it lends a flavor blast to your favorite dishes
- Prep Time
- 5 minutes
- Infusion Time
- 21 days
- Total Time
- 5 minutes
- Servings
- 1 cup
- Course
- Condiment
- Cuisine
- American
Instructions
-
Wash and dry your infusing materials. Place them in a glass jar.
-
Pour your vinegar over the material and seal the jar with a non-corrosive lid.
-
Steep for 2-4 weeks, shaking every couple of days.
-
When the flavor is to your liking, strain the vinegar through cheesecloth to remove all plant matter.
-
Store the infused vinegar in a clean jar for 5-6 months.
Notes
Infusion Time: 2-4 weeks
(Fresh seasonings can be added to the strained vinegar for decoration if desired.)
Flavor Ideas for Your Infused Vinegar
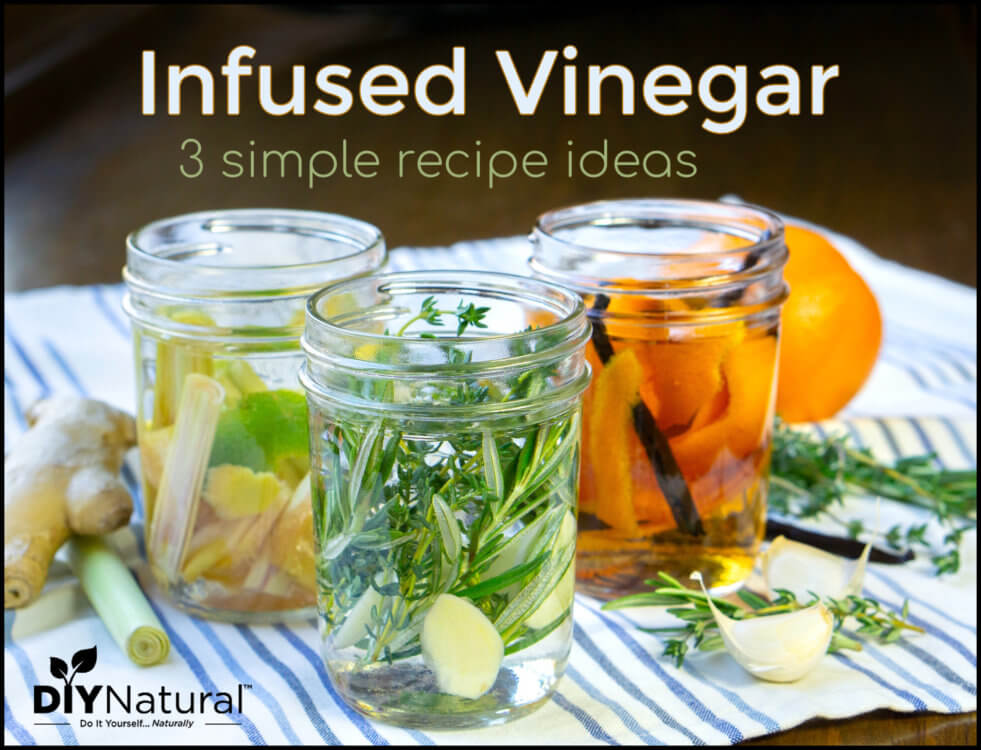
Garlic Herb Vinegar
- 2-3 Rosemary springs
- 4-5 thyme sprigs
- 1-2 garlic cloves
- 1 c white wine vinegar
Orange Vanilla White Balsamic Vinegar
- zest of 1-2 oranges (I use a vegetable peeler to peel off strips of zest)
- 1 vanilla bean, sliced horizontally and cut to fit in your jar
- 1 c white balsamic vinegar
Lemongrass Ginger Vinegar
- 2 inches fresh ginger, peeled and sliced
- 2 lemongrass stalks
- 1 strip of lime zest (optional)
- 1 c white wine vinegar (or white balsamic vinegar for a sweeter finished product)
Made this recipe?
Mention @diynatural or tag it #diynatural!
In summary, making infused vinegar is excellent for many reasons. First, you can create vinegar recipes that excite your palate. Second, it is a very simple and fun process. Lastly, you end up with a product that empowers you to add an explosion of flavor and bite to your favorite homemade dishes!
What type are you planning to make?
*******
Homemade Apple Cider Vinegar
We also have a tutorial on how to make apple cider vinegar! Check it out.


